


Most Common Answer Quiz - Multi-Page
This type of quiz is used to give results based on how many similarities there are between the answers to the questions and the possible results. It will give the user the result that most closely matches the corresponding answers they gave.
We will go over the multi-page setup.
How we did it
Using the SDK’s event listeners, we track which answers the user is clicking on. Then, once the user reaches the end of the quiz and clicks to view their results, we show the layer that is tagged with the name of the answer that they gave the most.
How to implement
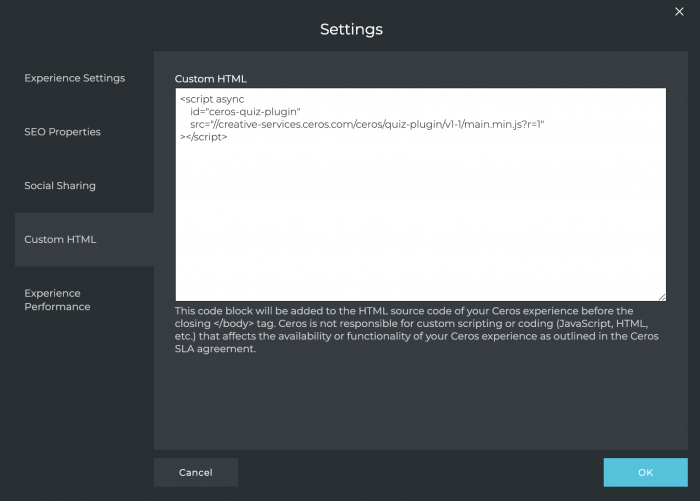
1. Add Quiz Plugin Code to Ceros Experience
Create a new Ceros Experience in the Ceros Admin and Paste the following code in the Custom HTML section of the settings panel:
2. Create Quiz Assets - Question Pages with Answer Hotspots and Result Pages
First, create the assets for the quiz. For example, you could have 4 questions with 4 possible answers (A, B, C, D or 1, 2, 3, 4), with the last question directing you to one of 4 possible results.
For a multi-page quiz, create a page for each question, a page for each result, and a start page if you would like.
Based on the tagging you set up, four clicks on answer “A” would return result “A.”
When there is an even number of questions, in the event of a tie (i.e., if there are 4 questions and the user clicks “A” twice and “B” twice), the result will be based on the alphabetical sequence of the value tags, so value:a would win over value:b.
In other words, if 50% of the answer values were “A” and 50% were “B,” result “A” would be shown since “A” is first in the alphabet.
Keep this in mind if you want a certain result to display in the event of a tie.
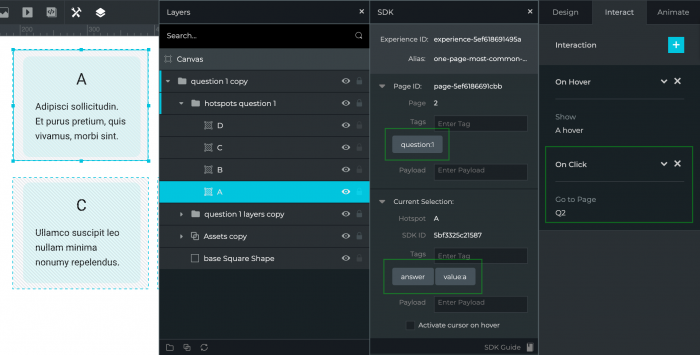
3. Create and Tag Answer Hotspots, Add Click Interactions
Next, create a hotspot over each answer choice.
After the hotspots have been created, add the appropriate tags to them within the SDK panel and the click interaction necessary to show the next question.
Click the SDK icon (wrench and hammer) in the toolbar to bring up the SDK panel.

- Select the hotspot you want to work with.
In the “Page ID” section, add the following tag:
question:xThis tag defines the question the answer belongs to. In this case,
xidentifies the page that the question is on. For example, if this page contains question 1, usequestion:1as the tag for the page.(Note: This will only need to be added once as it is a global tag for the page.)
For example, you could have 4 questions (one question per page) with 4 possible answers (A, B, C, D or 1, 2, 3, 4), and the last question directing you to one of 4 possible results pages.
Under “Current Selection,” add the following tags:
answerThis identifies the hotspot as an answer.
(Pro Tip: All answers must have the
answertag, so to save time, you can select all answer hotspots and add this tag to all of them at the same time.)value:x
In this tag,
xis the value assigned to the question, or in other words, which option was selected. For example, if this was answer “C,” usevalue:cas the tag.
In the example, we’re using A, B, C, D, as the values, but the values could also be something like the name of the question, or another word or phrase.
- While the hotspot is selected, add the “On Click” interaction to take users to the next page.
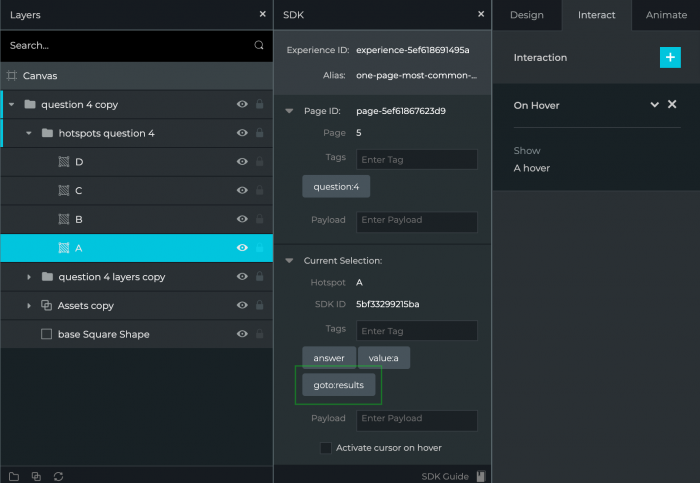
The final question’s answer hotspots will have the same tags as listed above, but with the addition of the tag of goto:results to each hotspot.
The goto:results tag takes care of sending users to the results page so, there does not need to be a click interaction on these hotspots, but you can use an On Hover interaction to boost the style and user experience.
NOTE:
Since the hotspots created for the quiz plugin only trigger SDK commands, Click and/or Hover are NOT sent to Ceros analytics, Google Analytics, Google Tag Manager or any other analytics platform via the Universal Analytics feature because typically no interaction added to the hotspot. You could of course have a setup where clicking on an answer choice triggers a pop-up, etc., but if you do not have something like that, to work around this, there would need to be a Click and/or Hover interaction added to the answer choice hotspots if you want them to be tracked. It can be anything, i.e., toggling visibility of a shape that exists off canvas.
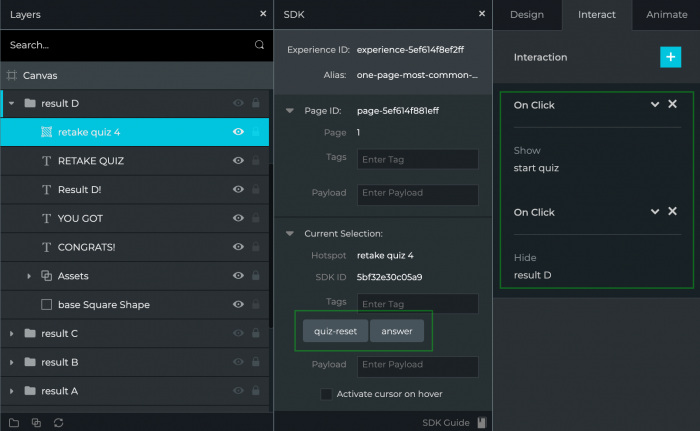
4. Tag Results Pages
Add the following tags to each result page:
resultsThis indicates that it is a result page.
The name of the value the page represents.
For results page “A,” use
aas the tag.

Pro Tip: Each result page must have the “results” tag, so you can select all of them and add the tag to all at the same time.
5. Option to Reset the Quiz and Start Over
To reset the quiz, add a hotspot with the tags answer and quiz-reset to a button (i.e., a square shape and a hotspot), along with an “On Click” interaction on each result page go back to the start page.
The quiz-reset tag resets/clears the score, and the click interaction takes the user back to the start page.
That’s it! You have successfully created a multi-page most common answer quiz.