


If you are using Google Tag Manager (GTM), you can leverage the Studio integration with GTM to send page view, click, and hover events to a tag configured in a GTM container.
Note: When embedding Studio content onto your website, you will need to have your GTM container script defined on the parent page, as our integration will be sending events from our iframe to the parent page’s GTM instance.
This allows you to send your Studio metrics (i.e. page views, clicks, hovers) back to Google Analytics or any other analytics platform you are currently using, enabling you to keep all of your analytics in one place. If you are already managing your tags through GTM, you can continue to do so with the Studio.
Things to keep in mind
When a Studio experience is shared as a standalone experience either using the view.ceros.com URL or a vanity URL, the GTM script is loaded within the experience just like any standard implementation of GTM on any webpage.
Pageviews, clicks and/or hover events will be sent to Google Analytics provided the tags are set up, and any other tags that fire on page view, DOM ready or window loaded will also fire. This functionality is built in, and there is no need to manually add the GTM script.If a Studio experience is embedded, and the "Initialize GTM for Embedded Experiences" option is enabled within the integration settings, GTM will be loaded inside the Ceros iframe, and any tags that fire on page view, DOM ready or window loaded will fire inside the Ceros iframe.
If a Studio experience is embedded, and the "Initialize GTM for Embedded Experiences" option is disabled, within the integration settings, the GTM container will NOT load within the Ceros iframe. In this case, all page-level metrics/events will come from the parent page, and the Studio will only send click and/or hover events to the GTM instance on the parent page.
For embedded Studio experiences, the integration relies on a correct and standard implementation of the GTM script on the parent page.
If that is not present, is present but not configured properly, or the container ID used on the parent page does not match what’s used in the integration settings, events will still be sent, but they will not go anywhere.
What is sent via GTM?
The Studio sends a page view event, as well as click and hover events for Studio elements that have click and/or hover interactions added to them.
Example Pageview Event Sent to the Data Layer:
dataLayer.push({
event: "ceros-pageview"
cerosPagePath: "/my-account/my-experience/p/1"
cerosPageLocation: "http://view.ceros.com/my-account/my-experience/p/1"
cerosPageTitle: "Overview Page"
});
Data Values:
event: This identifies the source of the page view event (Ceros) and is used as a trigger value for custom tags in the GTM container. This value cannot be changed.
cerosPagePath: The relative path and query params of the page URL.
cerosPageLocation: The full page URL (including query params).
CerosPageTitle: The title of the page set in the Studio.
Example Click/Hover Event Sent to the Data Layer:
dataLayer.push({
event: "ceros-event",
cerosCategory: "ceros-event",
cerosAction: "ceros-click",
cerosLabel: "Hotspot Label Example - Download CTA"
});
Data Values:
event: This identifies the source of the event (Ceros) and is used as a trigger value for custom tags in the GTM container. This value cannot be changed.
cerosCategory: This value is used as a top-level grouping of the click/hover events. The default is “ceros-event, but this can be changed in the integration options.
cerosAction: This is the name of the event being sent. The defaults are “ceros-click” and “ceros-hover” for click and hover events, respectively. These values can be changed in the integration options.
cerosLabel: This is the name of the object in the Studio (typically a hotspot) that triggers the event.
Whether the Studio experience is embedded or standalone, you must have tags, triggers and variables set up within the Tag Manager container in order for events to pass to Google Analytics. With the integration turned on, the Studio will always send events, but if there are no tags set up, those events will not go anywhere. This guide will explain how to set up Tag Manager for Ceros events.
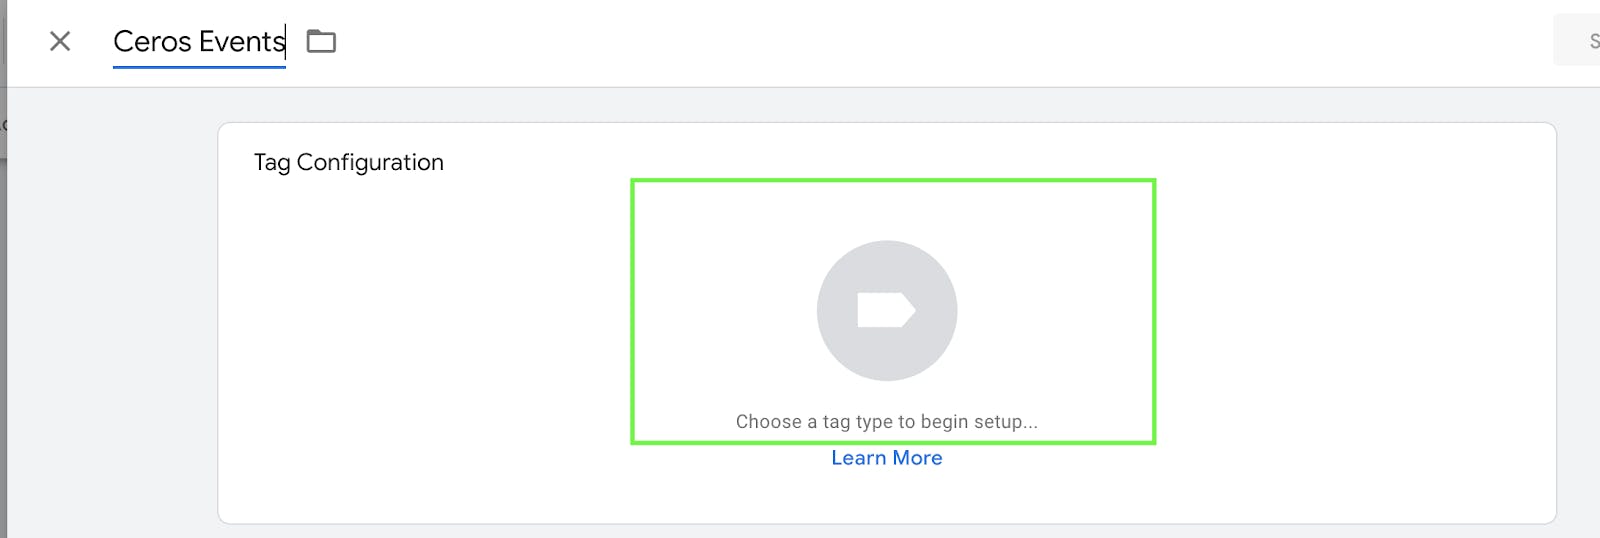
Setting up your GTM integration in the Studio:
Copy your GTM Container ID from Tag Manager.
If embedding, the container ID used here must match what’s used on the parent page.To set up the integration at the Account Level, in the Ceros Admin, select your name from the drop down and navigate to Account > Integrations.
To set it up at the Experience Level, click the gear icon on the experience within a project.Toggle on the integration for Google Tag Manager
Paste in your Container ID
If the experience will be standalone, toggle on Track Page Views for Standalone Experiences.
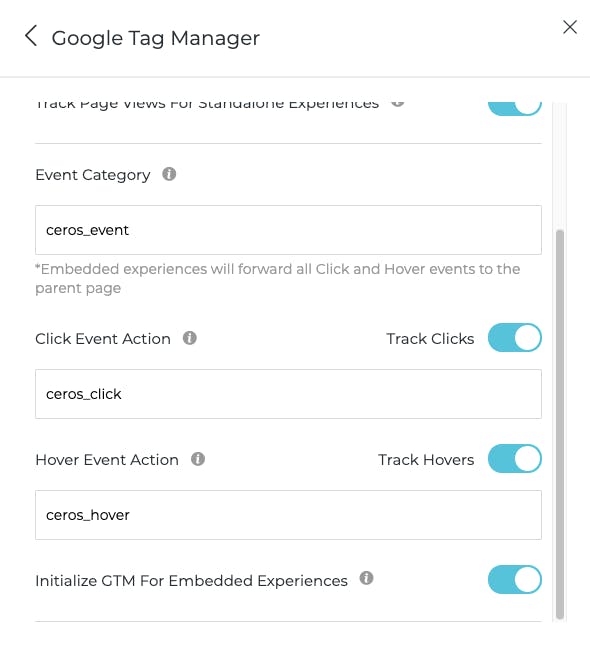
Page view events will not be sent if the experience is embedded.Identify your Event Category, this will be used as the top-line grouping of the click/hover events. You can leave it as the default “ceros-event” unless you need to use a different category name.
Toggle on Track Clicks, Track Hovers, or both. You can also enter your own Click Event Action and Hover Event Action values, but most people tend to use the defaults. These values will be sent back to identify your click and hover events
Make sure that when creating your Studio experience, each interaction is on a hotspot that is labeled with a specific name—the names of your hotspots are going to be the event values that identify what is being clicked and hovered over, so it’s very important to have unique names on these.
Click Save.
That’s all you need to do on the Studio side. Next, we’ll go over how to set up Tag Manager to fire tags on Ceros events.
Getting Ceros Events from GTM to a GA4 Property / Data Stream
We will cover one possible way to set up a tag that would fire on any Ceros event, whether it’s a click or a hover.
This is meant to be a simple guide or example, and should not be considered the standard for setting up Tag Manager to send Ceros events to a GA4 property.
Although the below steps may happen to work for your needs and could be a good starting point, there are a number of different ways to approach this depending on the needs of an organization, and there will not be a “one size fits all” setup.
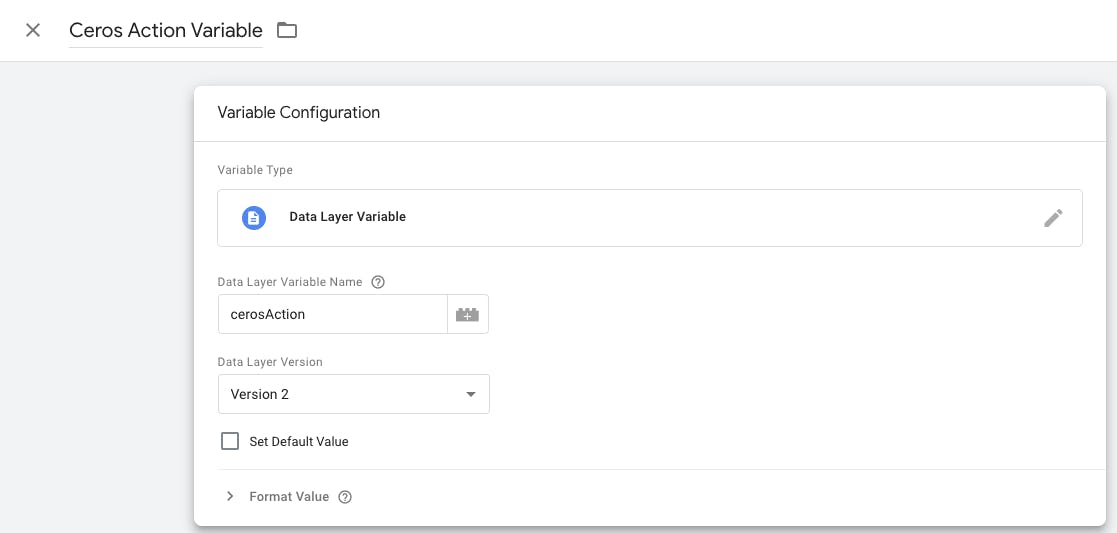
Step 1: Set up Ceros Event Variables
Go to Variables and select New under “User-Defined Variables”
Click Variable configuration and select Data Layer Variable
Create variables for cerosAction, cerosLabel, and cerosCategory.
Below is an example of what cerosAction would look like. Repeat for cerosLabel and cerosCategory as well.
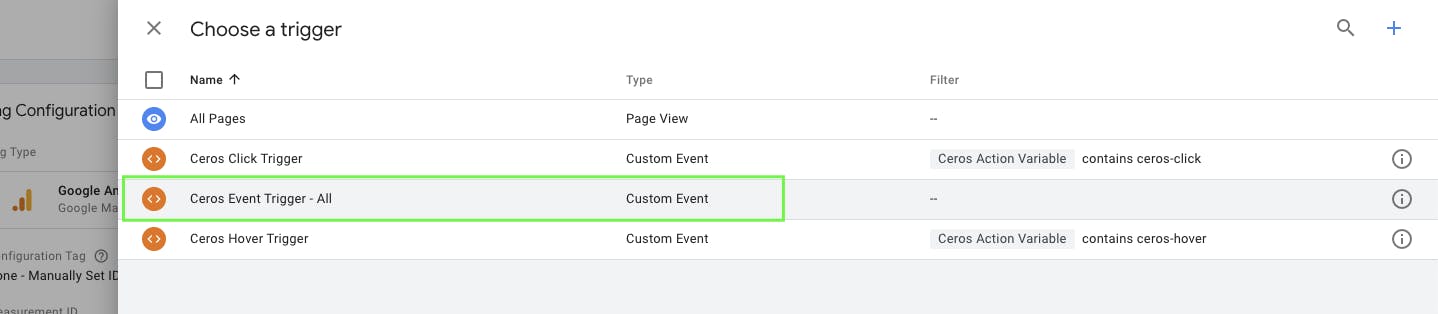
Step 2: Set Up Ceros Trigger(s)
Go to Triggers, select New
Click Trigger Configuration select Custom Event
Give this a name and make sure “All Custom Events” is selected
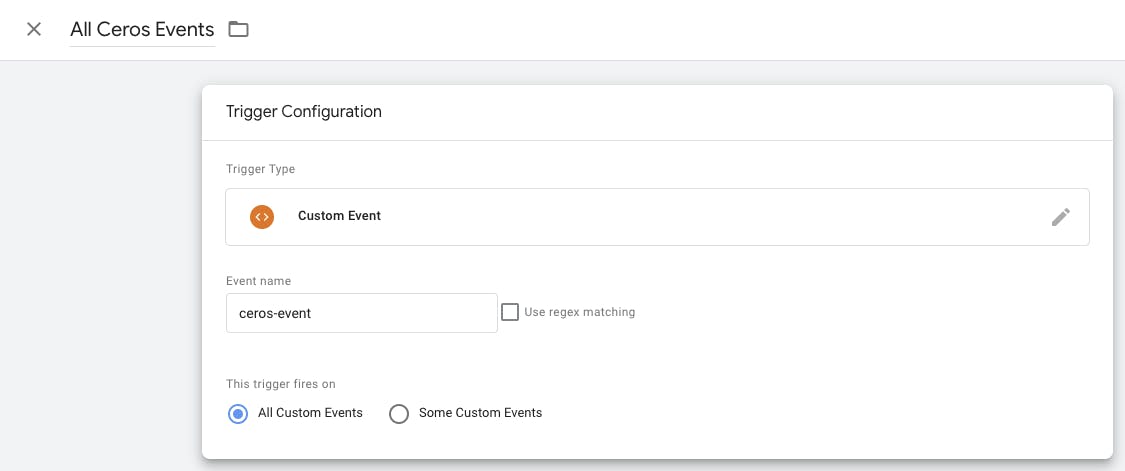
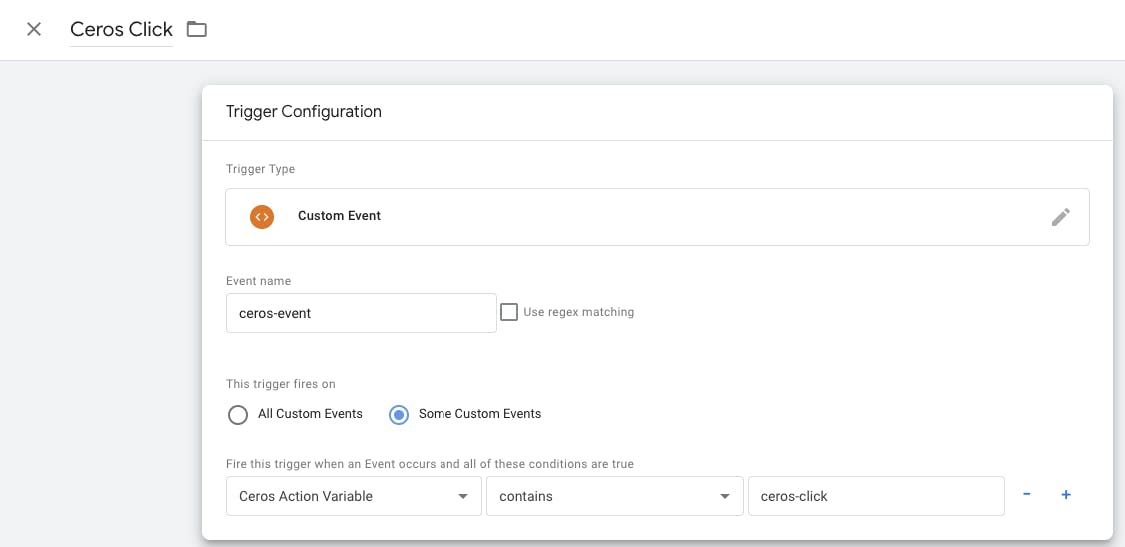
This trigger, when added to a tag, will fire the tag on any Ceros event, whether it’s a click or a hover, but you can also set up triggers for clicks and hovers individually by setting up a condition for each. Below is an example for a trigger that only fires for clicks.
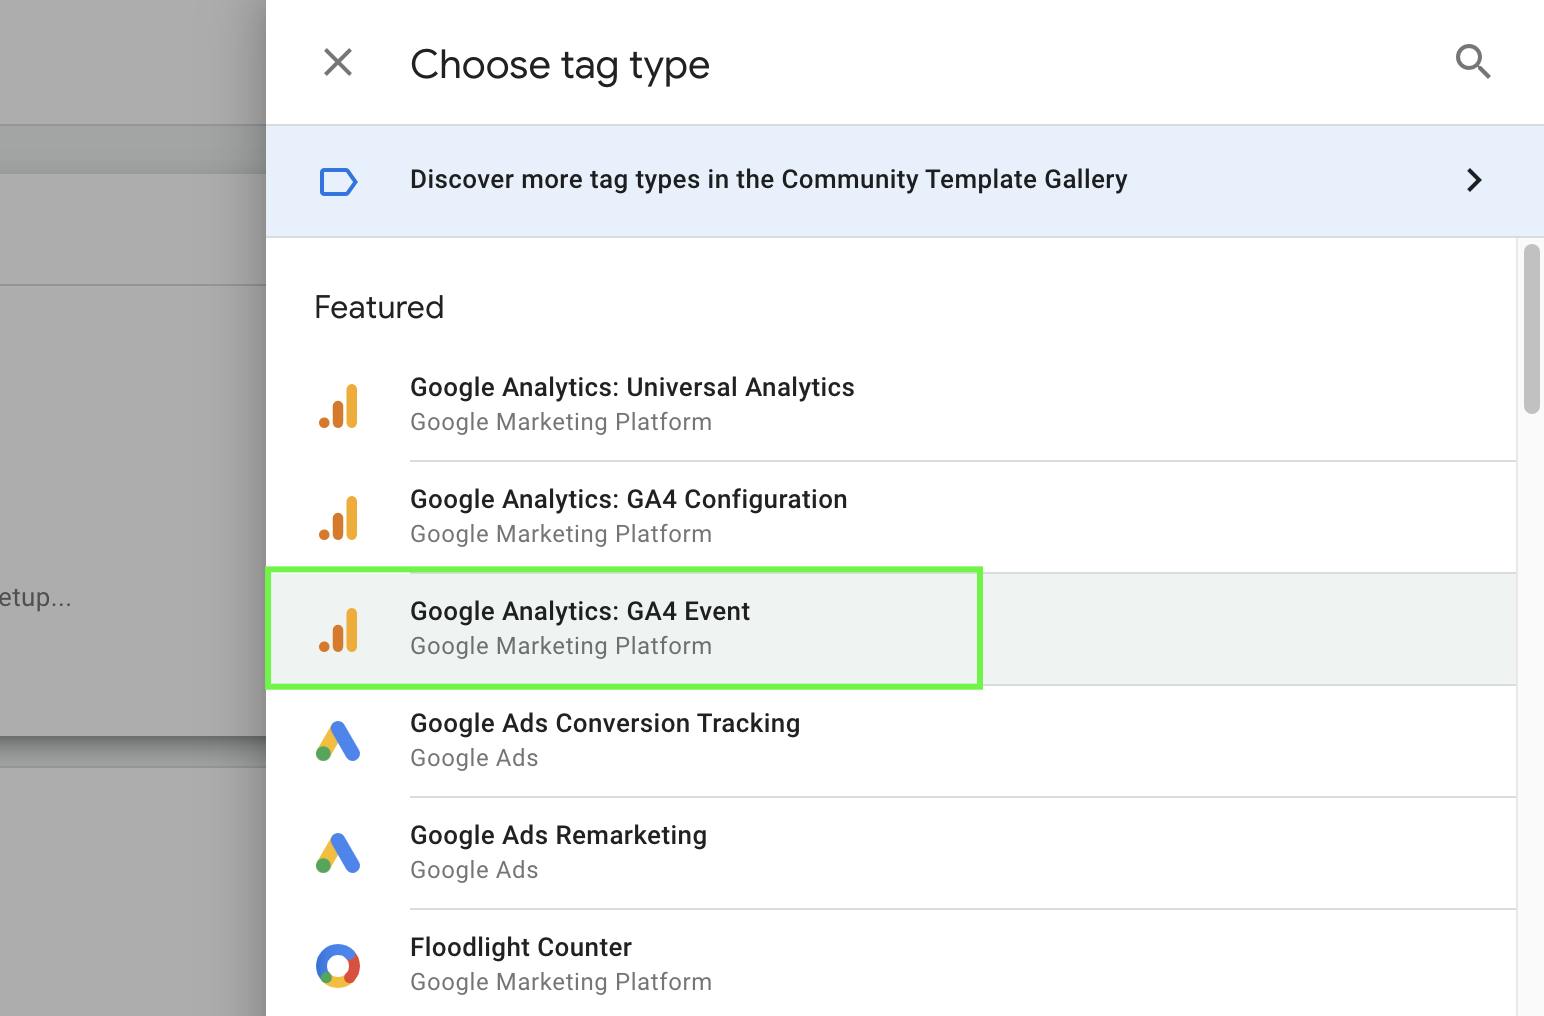
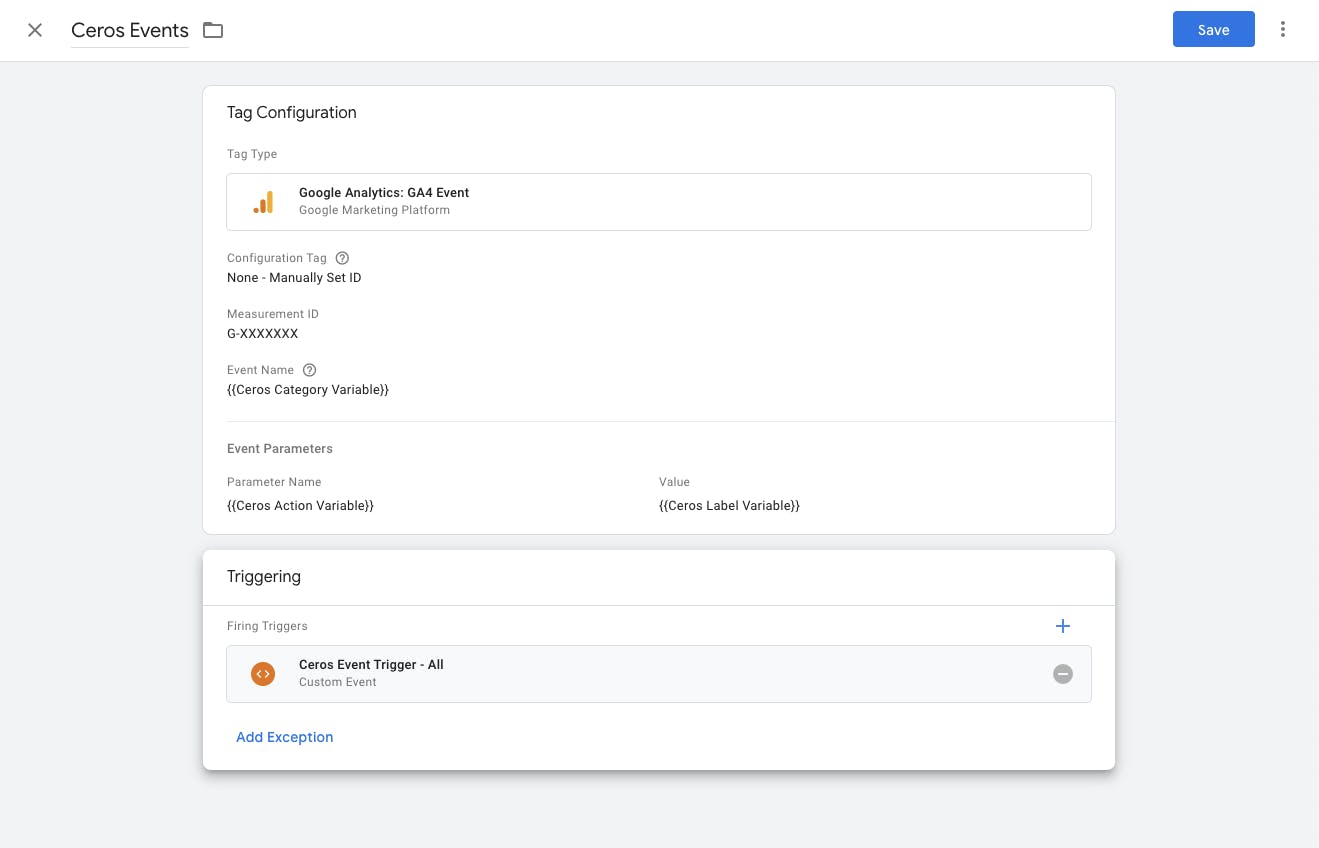
Step 3: Set Up Tag(s)
Go to the Tags Section and click “New”
Name it something, and click into the “Chose a tag type” area
Click “Google Analytics: GA4 Event”
Next, under the “Configuration Tag” dropdown, you can select “None - Manually Set ID��” and you will see a field appear to input your Measurement ID:
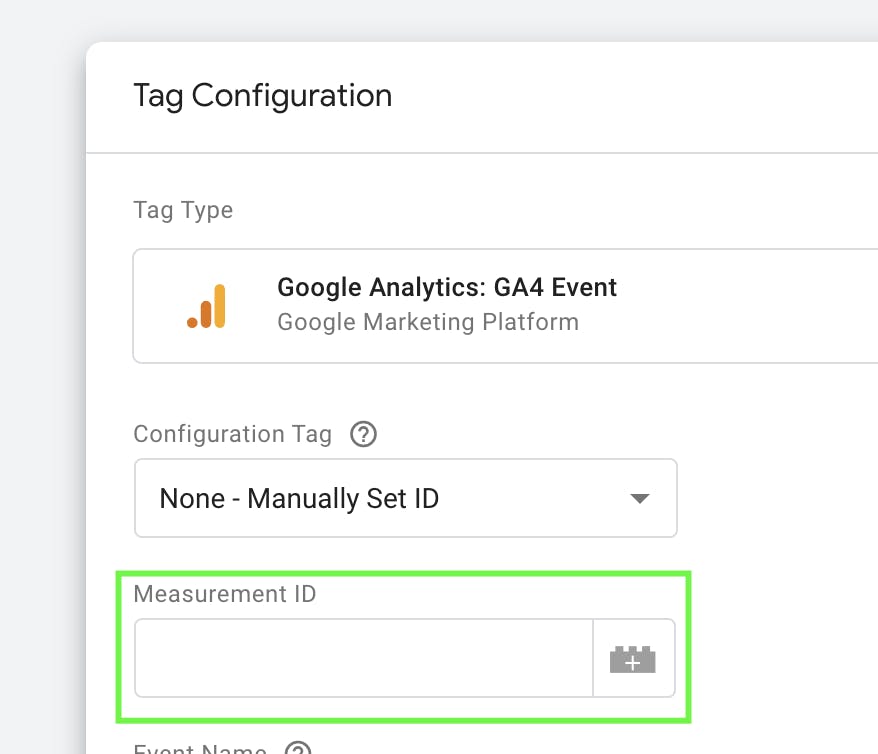
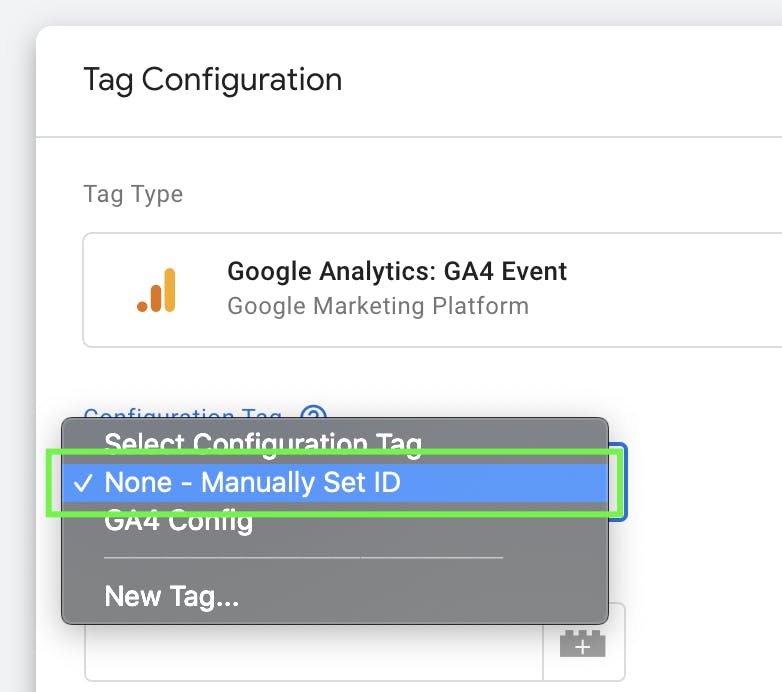
Alternatively, you could create a tag that contains the Measurement ID and use that instead.
Setting up the Event Name and Parameters
⚠️ This is where things can change based on what you want to see in Google Analytics.
With the way GA4 works, you have many choices when it comes to the naming of events.
One possible way to set this up could be to use the {{Ceros Category Variable}} as the event Name, which will create an event with a name that matches what’s set in the Event Category field within the Ceros Tag Manager integration, and then use the {{Ceros Action Variable}} as the Parameter, with the Value as the name of the Studio hotspot, populated by the {{Ceros Label Variable}}.
Here’s what this would look like:
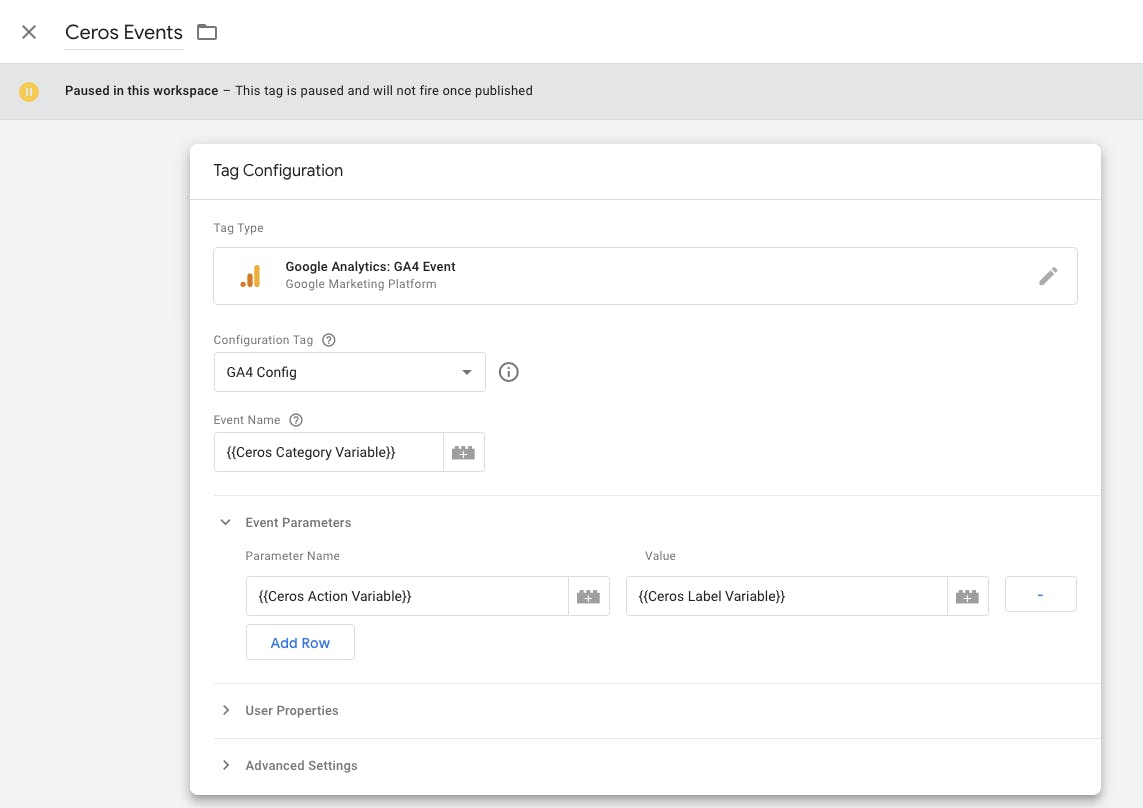
(In these screenshots we used a GA4 Configuration Tag rather than manually entering the Measurement ID, but the result is the same.)
We’ll continue on setting up the tag using this example, where the Event Name comes from the Ceros Event Category in the Ceros GTM integration settings, the Parameter Name will be the Click Event Action name or Hover Event Action name, and Value is the Ceros Event Label, which comes from the name of the Hotspot in the Studio.
To show this another way, using the default settings (modified to use underscores) in the Ceros Google Tag Manager integration, these are how the values break down:
Tag Manager <> GACeros
Event Name <> ceros_event
Parameter Name (for Clicks) <> ceros_click
Parameter Name (for Hovers) <> ceros_hover
Value <> {Name of Hotspot in the Layers Panel}
Click into the “Choose a Trigger” area
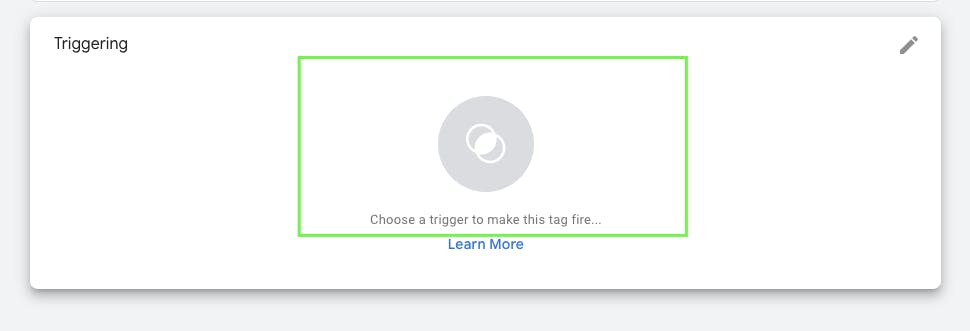
Choose the trigger you created in “Step 2: Set Up Ceros Trigger(s)” that fires on any Ceros event
This is what you would end up with:
Click “Save”
Preview the container to see if your tags fire, and publish if everything looks good.
Alternatively, you could of course set up tags for clicks only or hovers only using these same methods with some modifications. It all comes down to your specific tracking needs.
After this tag is set up, you will see events populate in your GA4 dashboard in the Real Time event.
⚠️ You will not be able to see them in reports unless the Ceros events are added as Custom Dimensions within the GA4 settings.
How this is set up depends on your needs and what you want to see in the report.
See our article on "GA4 & Ceros" for more helpful information.
Getting Ceros Events from GTM to a Google Analytics UA Property
First, follow Steps 1 & 2 above.
Those steps are just setting up the trigger(s) and creating the data layer variables, and the same procedure applies here. The only difference is that you are setting up a UA event tag, not a GA4 event tag.
After the variables and trigger(s) are set up, the next step is to create the tag (or tags) that actually send the events to a Google UA property.
The setup is very similar to the GA4 event tag example. As shown in the first part of this article, the Studio sends three (3) things in the data layer push for an event: cerosCategory, cerosAction, and cerosLabel, so you can structure your tag to use those variables in any way you see fit.
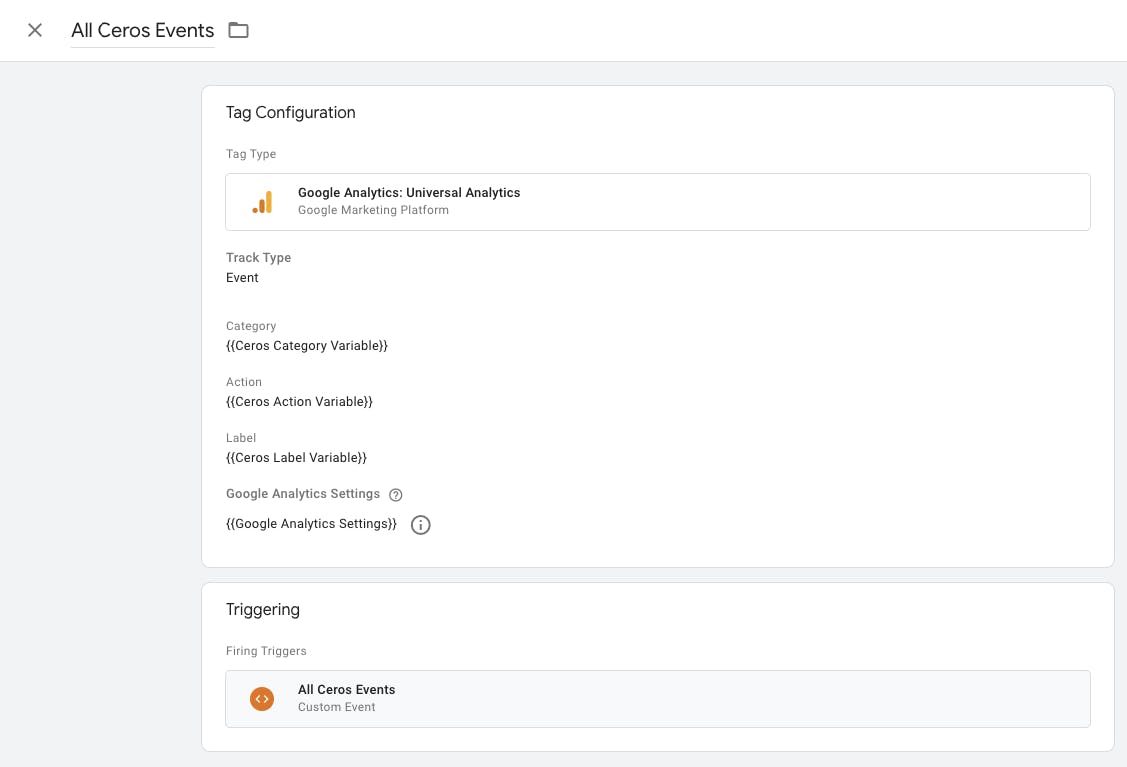
Step 3: Set Up the Ceros Tag(s)
Go to Tag and select New
Click Tag Configuration and select Google Analytics: Universal Analytics
On the drop-down for Track Type select Event
For Category, Action, and Label select the Variables you created
Value can stay empty unless you do have a value for the event
On the drop-down for Google Analytics Settings select your Variable for your Google Analytics
Click on Triggering and select the Custom Event you created in step 2
Make sure you name and save your new tag
Preview and check that events are being sent back to your Google Analytics dashboard
Your tag setup should be similar to below:
To set up a tag that fires only on a hover or only on a click, you would create those tags the same way but use the individual triggers.
Be sure to check out this article to learn more about setting up your Google Analytics Integration.
Tips & Best Practices
If you are leveraging the Studio Eloqua or Marketo integration, the integrations also load the Eloqua or Marketo Munchkin tracking scripts automatically.
If you are already loading those scripts on all pages through Tag Manager, it would be a good idea to suppress those triggers on Studio pages as it’s possible inflated metrics could occur since the script would be loaded on the page twice, and it’s just not necessary for them to be loaded twice.
It may be a good idea to prevent any third-party tracking or other Custom HTML tags from firing on Studio preview pages during design unless you need to test something.
The Tag Manager integration will not fire a pageview or Studio click/hover event when the experience is in preview, but other “on pageview,” “on window ready” or “on DOM ready” triggers will fire and could result in inflated metrics as the Studio preview window live-updates when edits are made, which refreshes the window and could potentially fire the tags hundreds of times while the experience is being worked on.
It could also be good practice to only turn on the integration when the experience officially goes live, in the event that the experience is published before the actual “go live” date.